Urban Light Quilt

What’s the saying, “better late than never”? That applies to this post! The timing of my blogpost has nothing to do with my enthusiasm for this pattern or quilt. I finished the quilt top MONTHS ago, but I’m just now getting around to showing the final project.

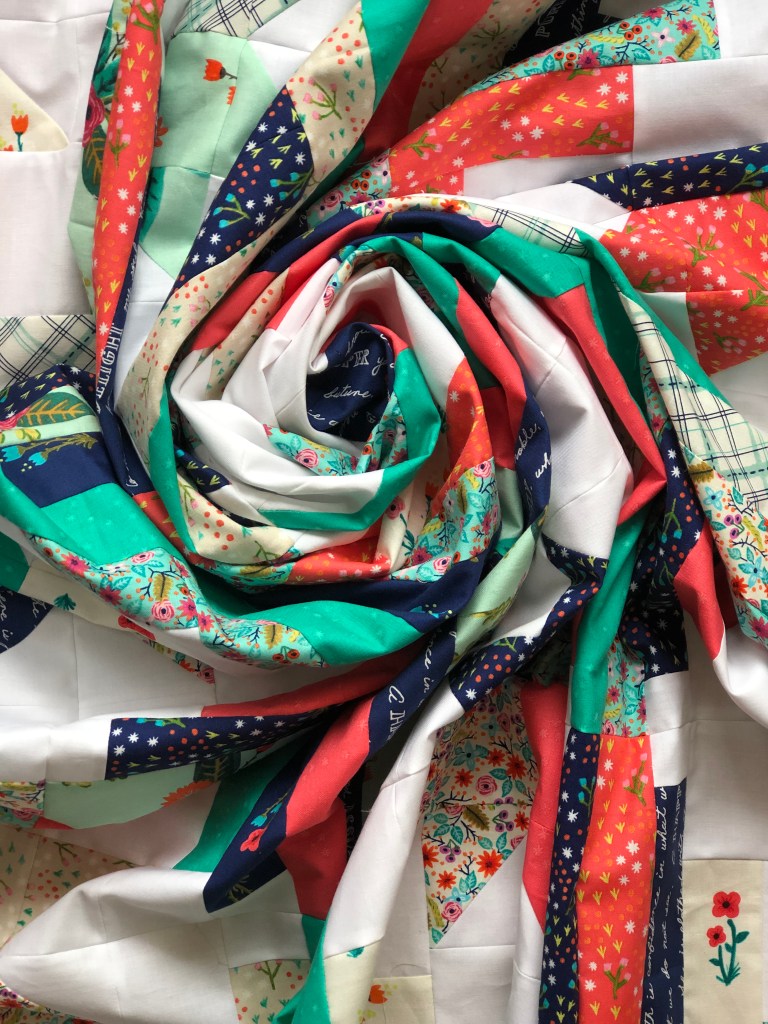
In the spring of 2021, I was asked by Karen, http://www.bloomingpoppies.net to test this pattern, the Urban Light Quilt. When I saw her mock-ups and how the color choices influenced the overall design, I knew immediately I wanted to make this. Not to mention, just wanting to work with a designer who loves improvisation, like I do.

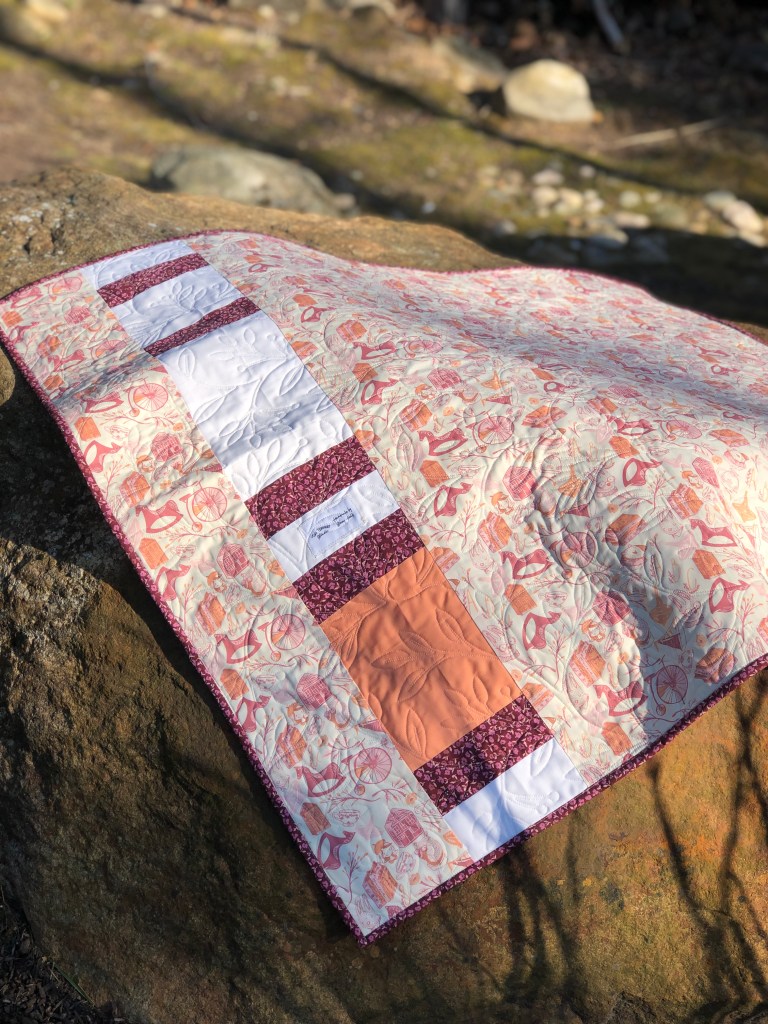
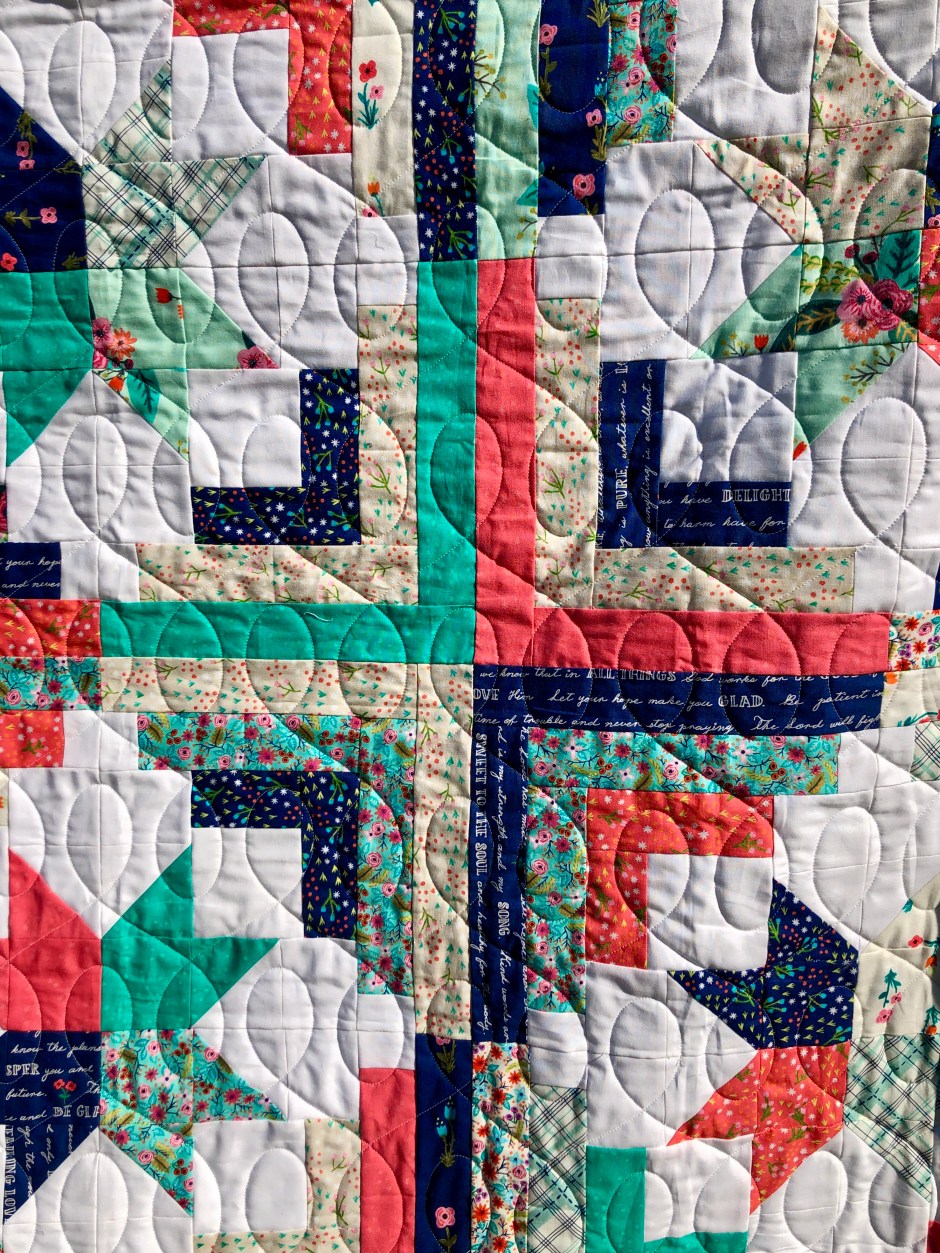
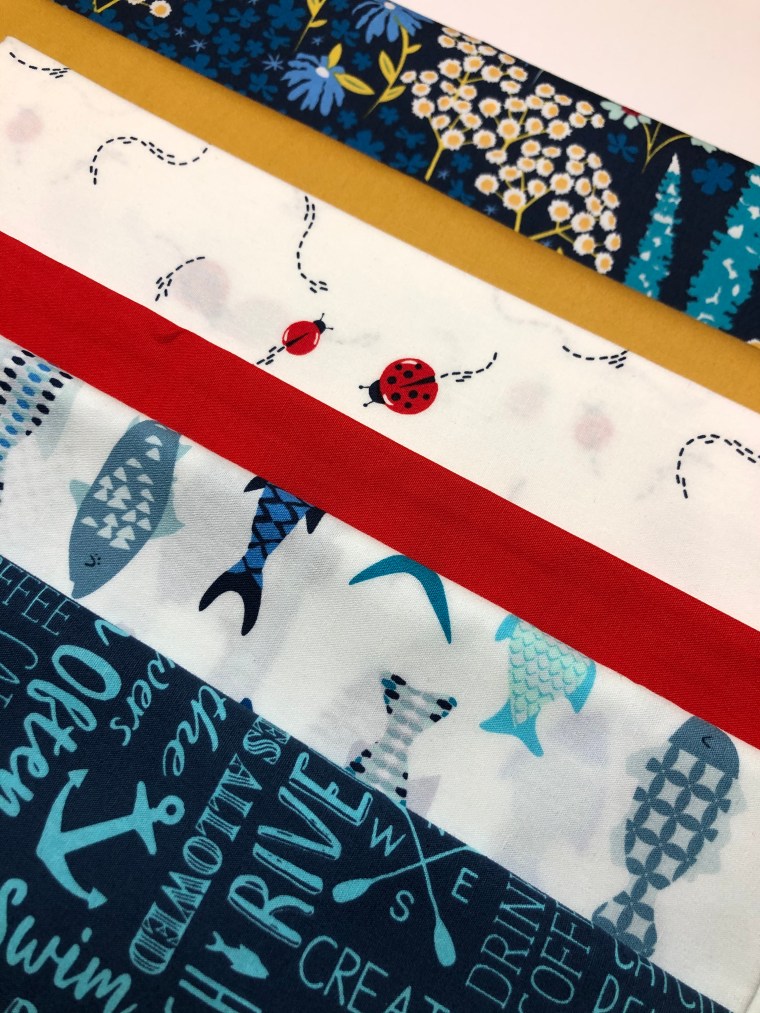
I pulled from my fabric stash and settled on this Catch & Release collection by Art Gallery Fabrics. More than 2 years ago, I sewed for the AGF Look Book & Blog party, and at the time I was so obsessed with the designs, I purchased several yards of each fabric after the maker projects were done. I’ve hoarded it a bit over the past couple years, but finding ways to incorporate it into new quilts has been nice.

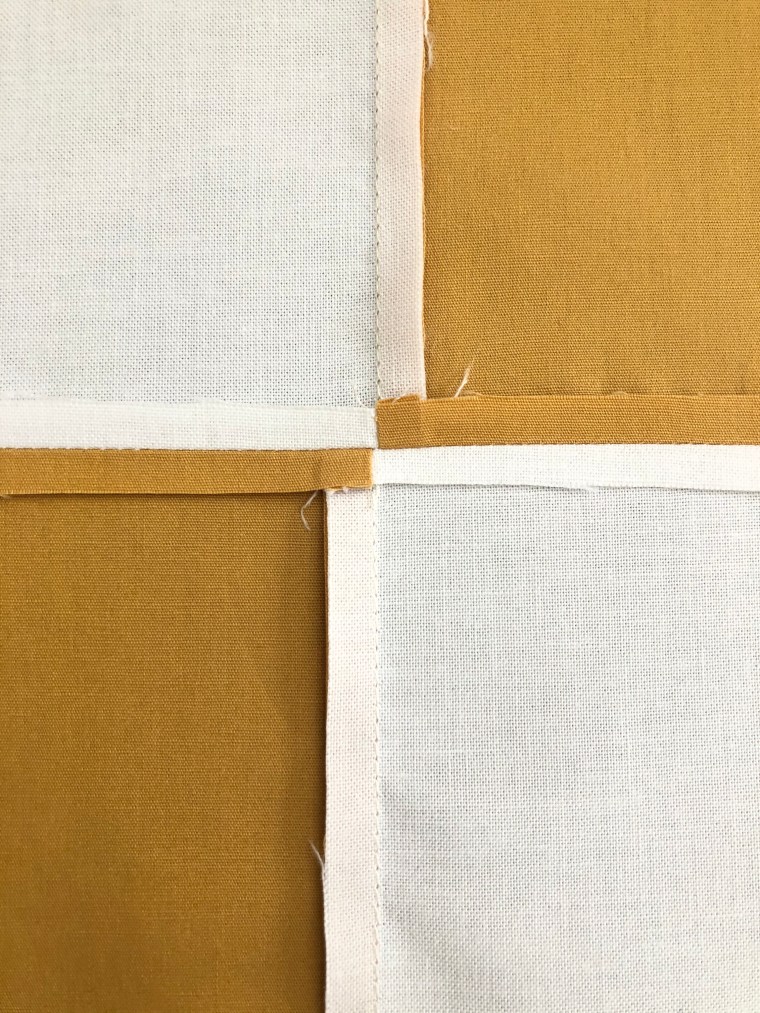
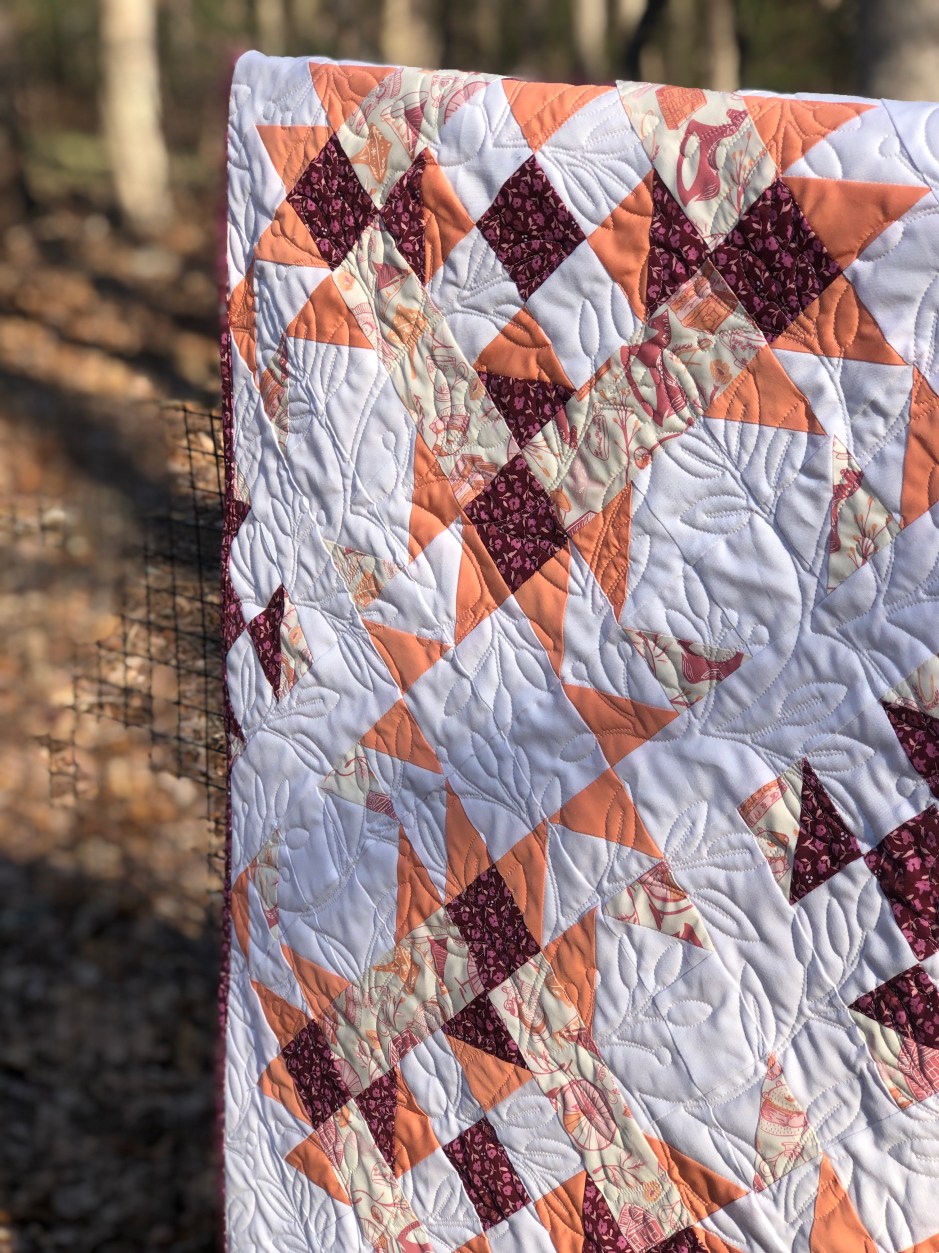
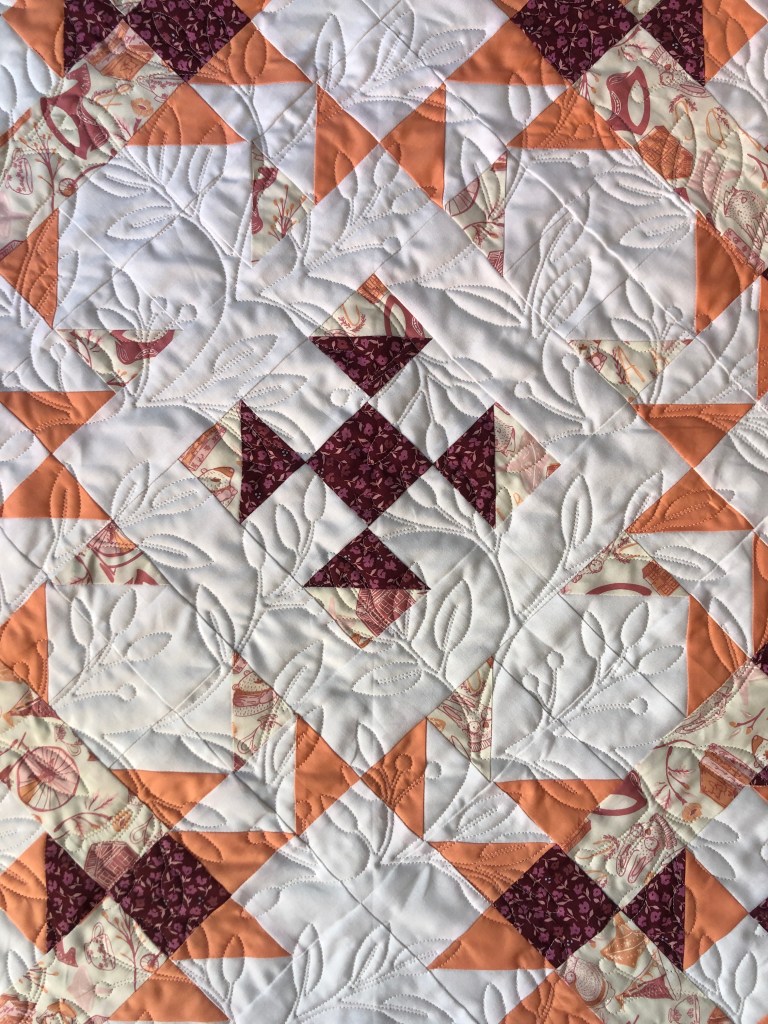
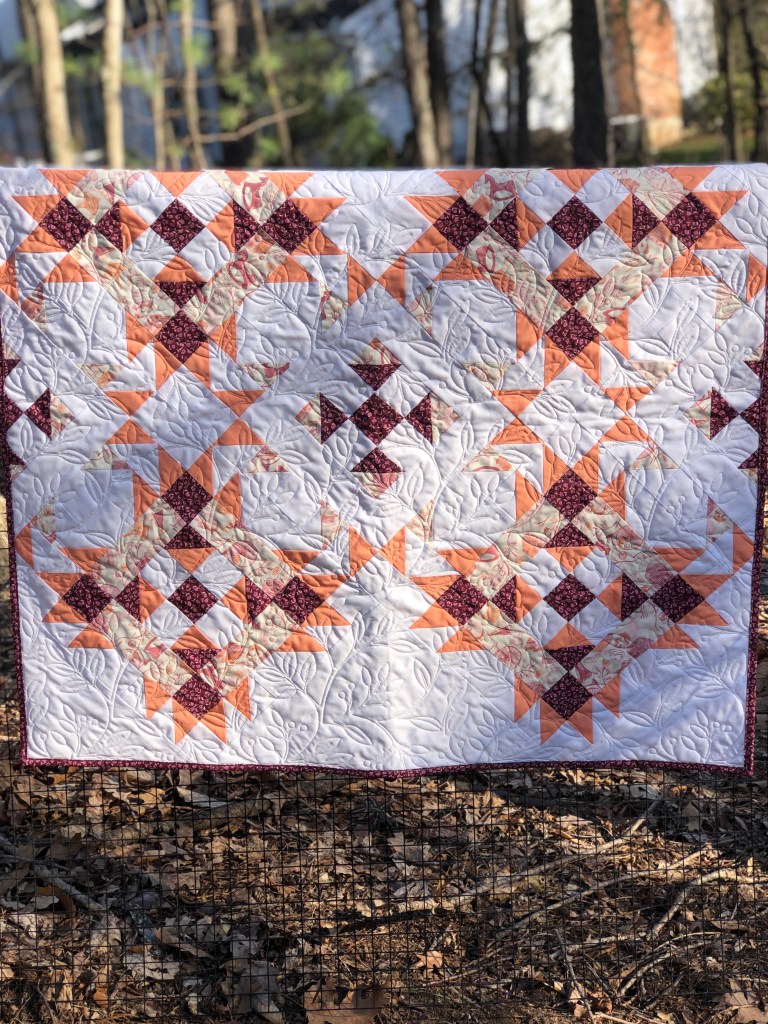
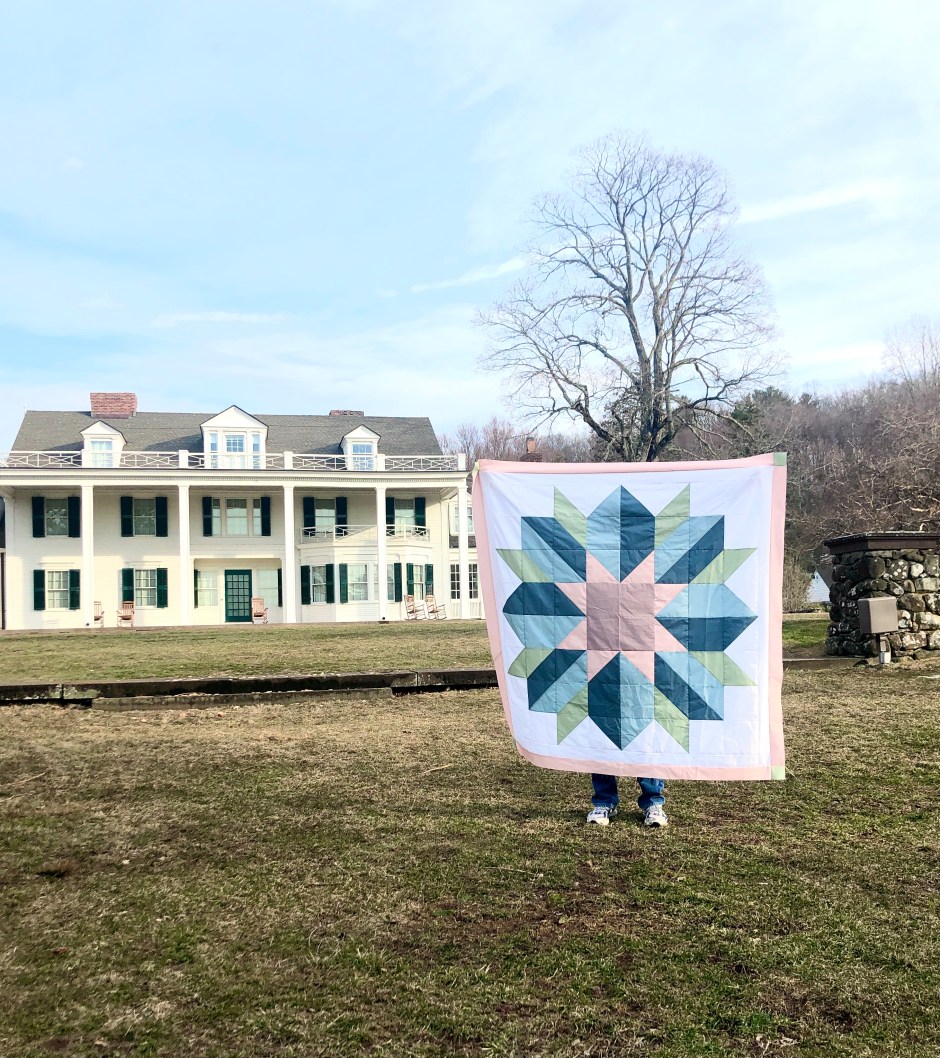
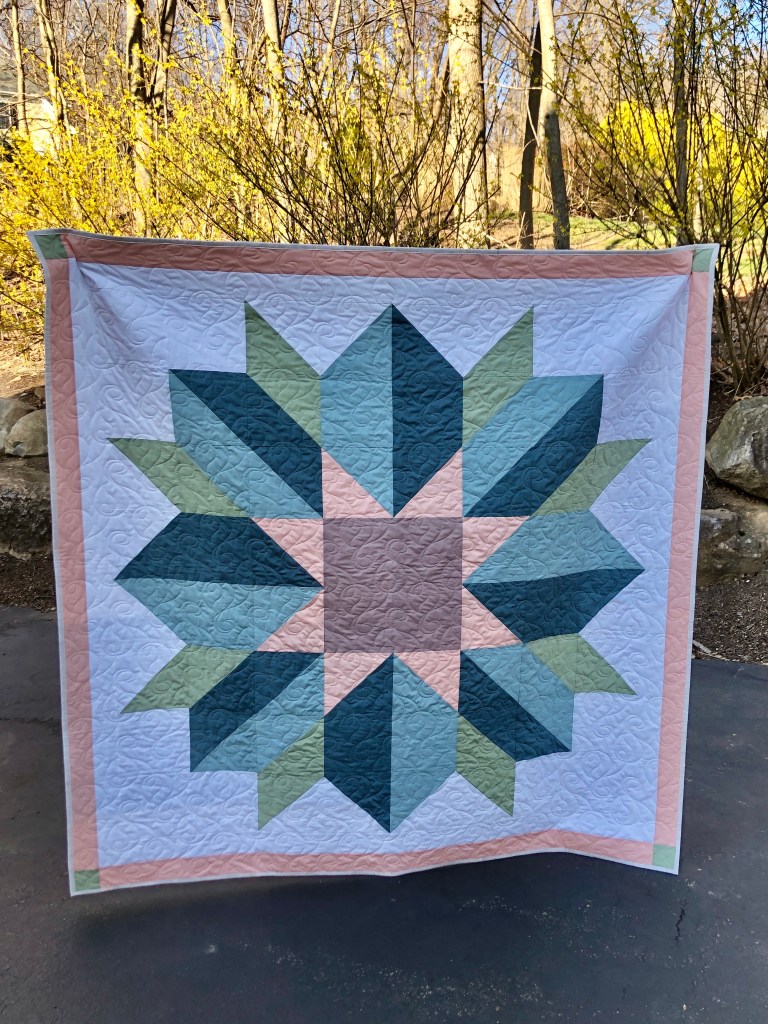
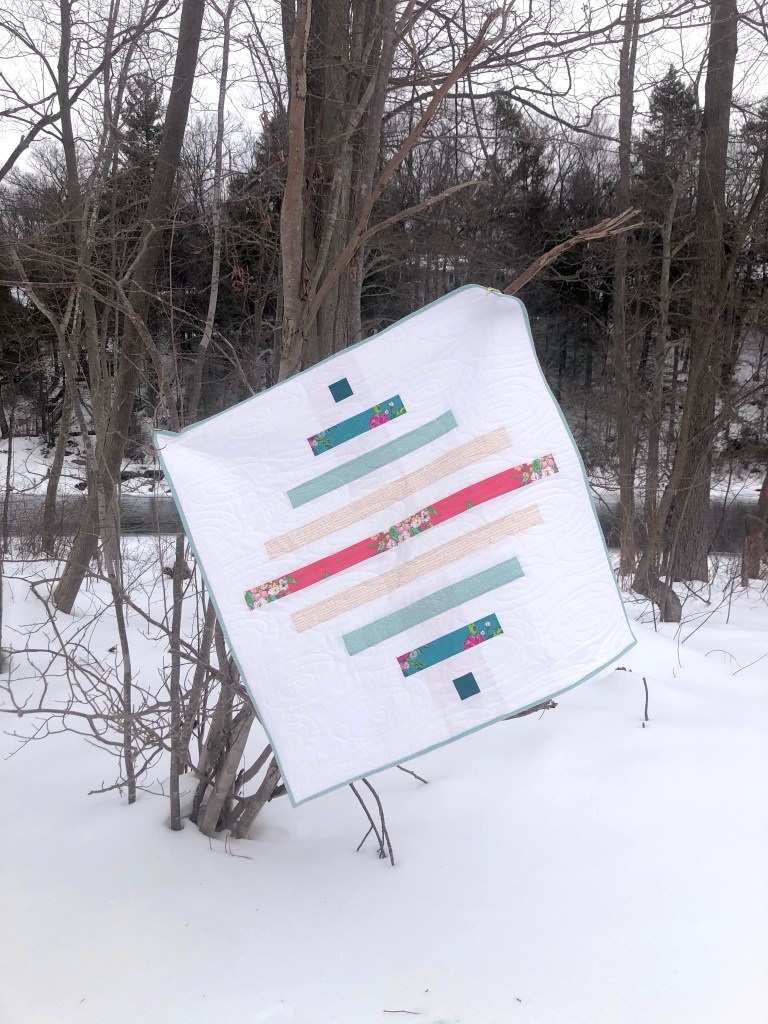
The Urban Light Quilt comes in 5 sizes, I made the large throw. One thing to note about this quilt is that the blocks are large, they repeat and make for a fast finish. The cutting instructions are very easy to follow and if my memory serves me correctly, I was able to put this together in just a couple days. I preface that with the reality that I have few distractions and blocks of time each day to sew. In any case, it’s not a pattern that will take much time given the design and overall block size.

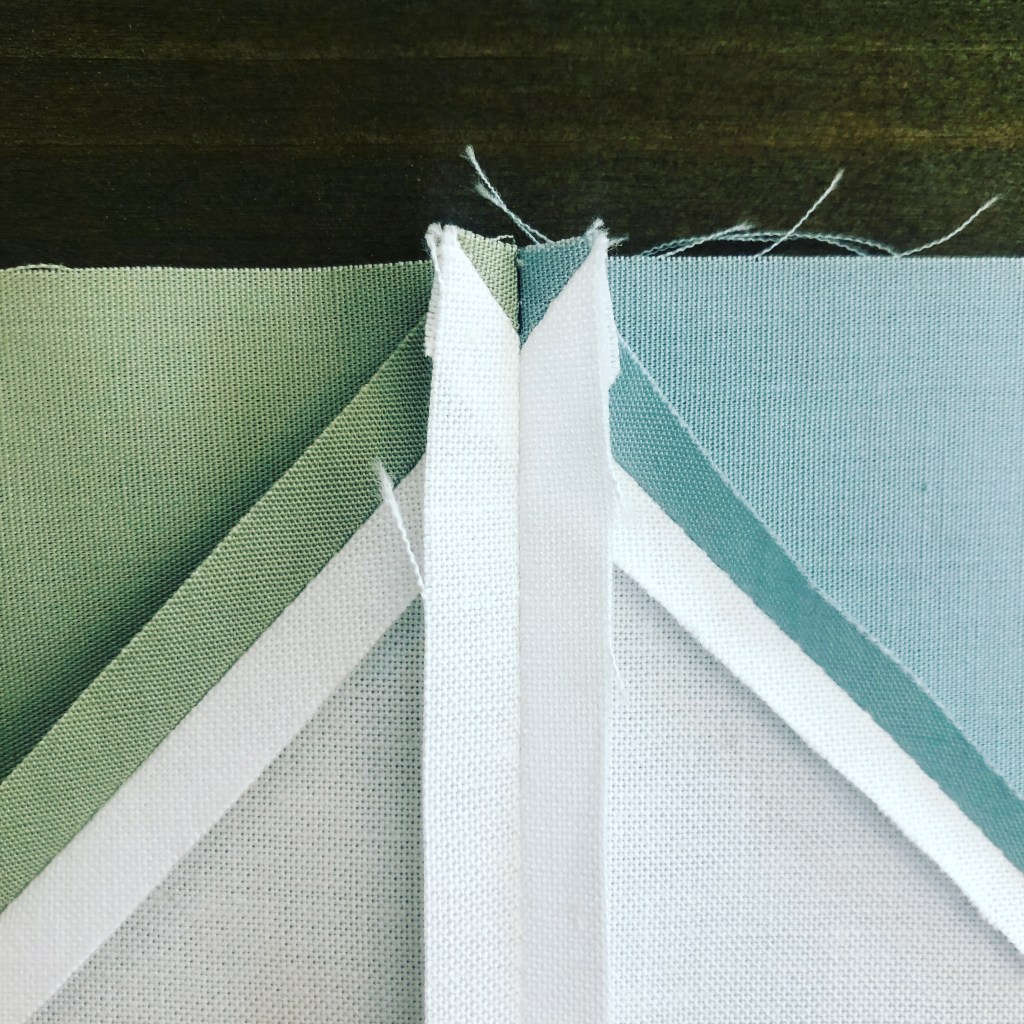
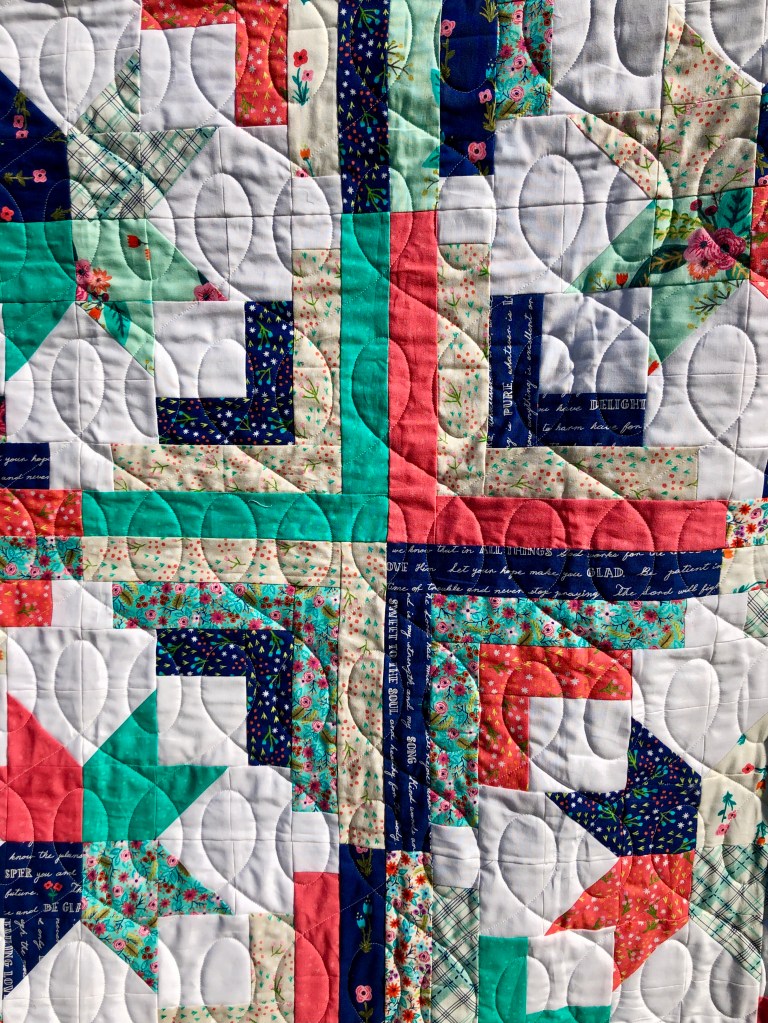
There are traditional elements like flying geese in this design. I love the no-waste approach. I did incorporate text fabric in my quilt and while some of it “reads” correct, directionally, I decided to not be too fussy about the blocks individually. With this particular print, the text is multi-directional on it’s own, so there didn’t seem to be an “up” distinction anyway. Also, with a square quilt, who even knows which direction it will be used on any given day. It all works out; don’t sweat it.

Untrimmed flying geese

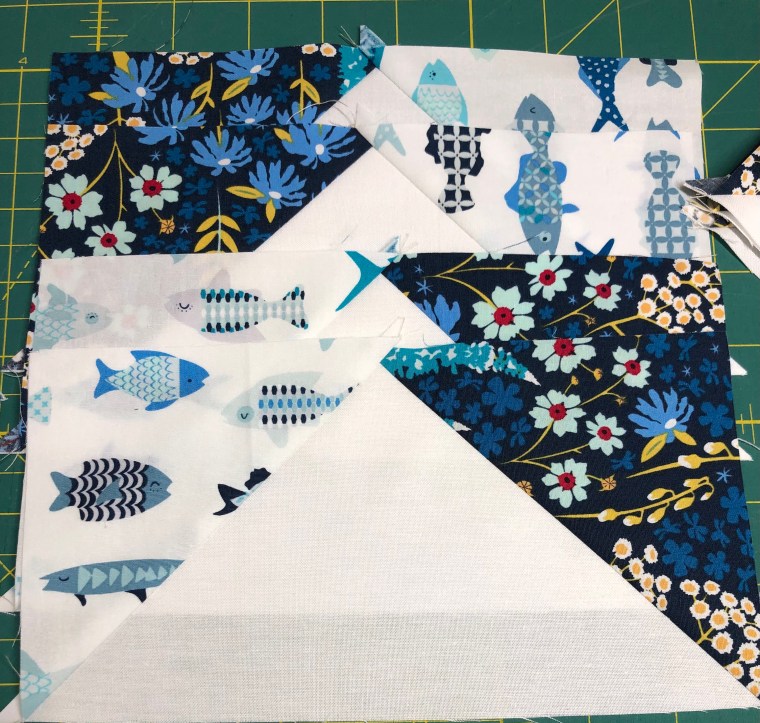
Aren’t the fish & florals just a perfect nod to summer? I think they are so sweet. There’s something whimsical about it that made me look forward to summer days.

It’s coming together.

This block, on its own, would make a beautiful pillow cover to accompany this quilt.

More geese…

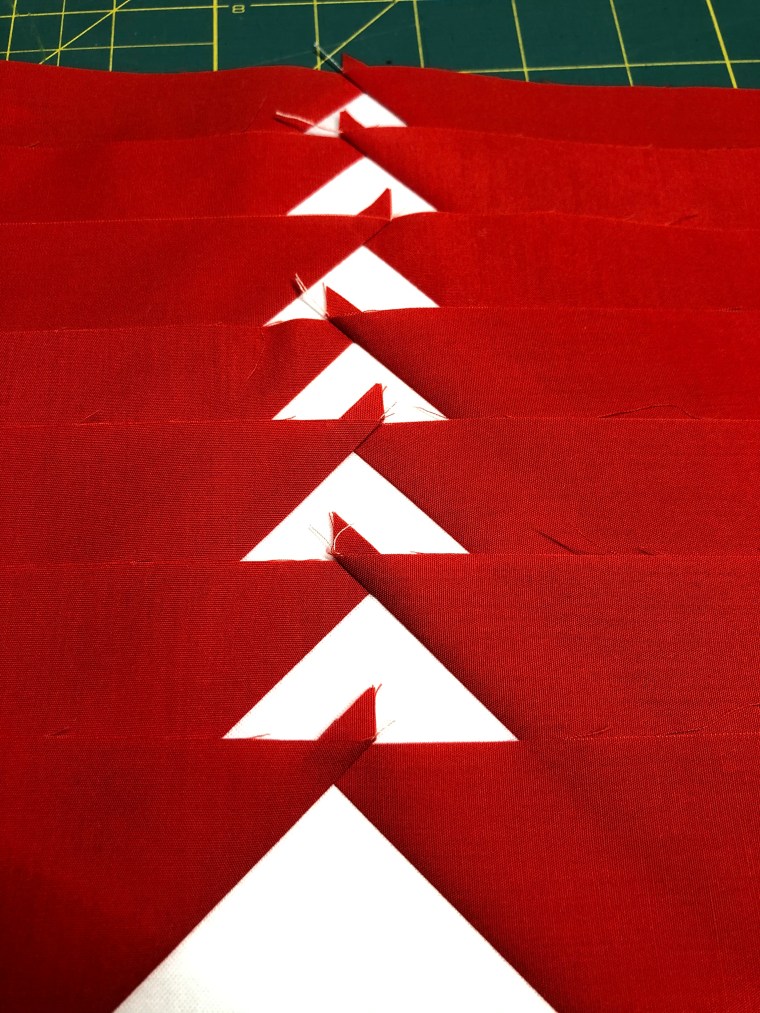
My favorite color is red and I chose to add a pop of this AGF Pure Elements Solid to the mix. In my opinion, it’s the perfect, clear red. I believe it’s actually called “London Red”. Favorite color and one of my favorite vacation destinations, how could it not work?

Urban Light, the completed top

As I mentioned, this quilt top and the pieced backing were finished in the spring of 2021. Snow was still on the ground in New England, but this bright fabric was calling for summer. I really like the simplicity of the blocks, but each time I look at it, I see another element in the design that pulls my attention.

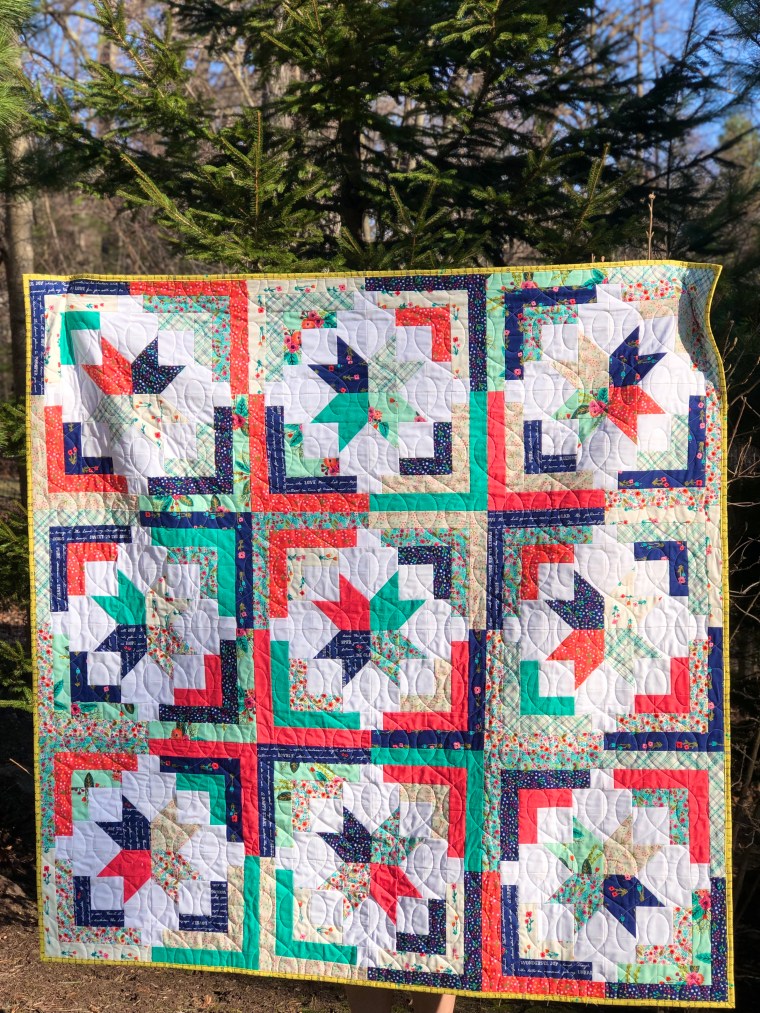
Fast forward to summer, June 2021 to be more specific, and my Urban Light is back from the longarm quilter. I brought it along on our family vacation, knowing that these water colors, fish, florals, and the patriotic feel would be perfectly photographed at the beach.

I chose an edge to edge pantograph that mimics the ripple of water. Don’t forget that the thread and this quilting is yet another element to be considered. After all the work to piece it together, I have to remind myself that there’s one more decision to be made. No time for snoozing. With so many angles, I like the smooth curves and motion across these blocks. The binding is done in a small floral, framing it all in red, white, and blue.

Urban Light at the MA shore

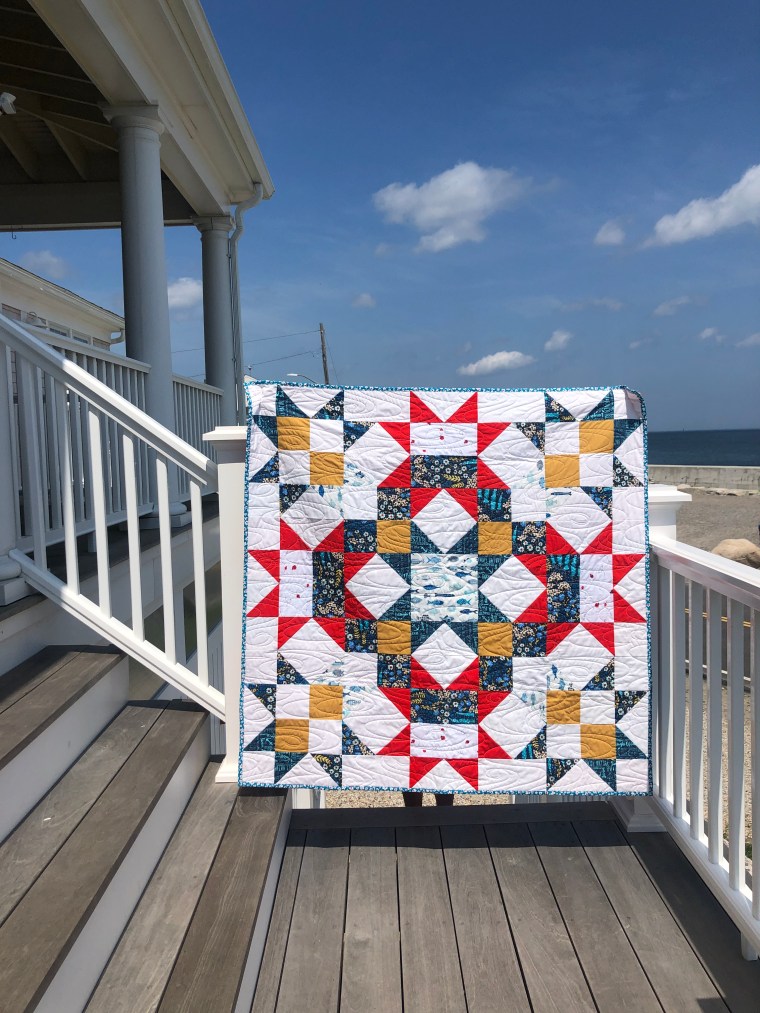
This is a pattern I would highly recommend and it’s available on the designer’s website mentioned above. Take a peek at her account or follow the hashtag to see the other tester’s variations; it’s interesting how color choice changes the look of this quilt. Seeing my own version, sometimes the center appears to be a floral motif, sometimes I notice the stars, sometimes it’s the POP of red. How fun to have a quilt with such dimension. I love it and hope it brings cozy snuggles to anyone who gets a chance to use it.

I’m appreciative of the opportunity to work with Karen & to have tested this pattern. I’ve worked with her again since making this one & that second quilt will be posted soon!

Happy Quilting…

All photos and content property of Two Terriers Studio; do not replicate or distribute without permission. This is not a sponsored post.

Garden Paths Quilt

It’s now May 2021 and I’m ready to be outside, enjoying all the spring gardens have to offer. Coincidentally, it’s also pattern release day for this latest quilt, designed by Brittany Tunison for White Plains Quilts. Meet the Garden Paths Quilt!

When the opportunity to test this pattern came up, I had zero hesitation. All of Brittany’s patterns are well written and make creating a unique quilt a breeze. I had recently seen a fabric by Art Gallery Fabrics http://www.artgalleryfabrics.com called “Little Clementine” and it was the catalyst for this color scheme. I was drawn in by the whimsical graphics of animals, florals, lettering, bicycles and more. The peach and plum colors are a bit out of the box for me, but I really love this print. I asked Brittany to “kit” fabric for me using this and a floral by Amy Sinibaldi for Art Gallery Fabrics called “promenade plum”. I could not be happier with the outcome.

Trimming

This pattern is heavy on the half-square triangles, probably best suited for an advanced beginner or someone who is interested in mastering their HST skills. I mean, I’ve made hundreds (thousands?), of half-square triangles, but there’s always room for improving those points, right? I think back to the early days of my quilting journey, about a decade ago now, and remember thinking, “Do I need to trim all these dog ears?” The answer is YES. It may not seem like much, but squaring up blocks is important and that little bit of excess over the entire quilt does add up to a lot of inaccuracy. Just take the time to trim your blocks, if you’re not doing it already. Added bonus, look at all that fabric confetti goodness.

Matching points…game on

I like to press my block seams and see all the pieces lined up along the way. Sometimes progress is slow, but having pretty fabric and little piles of finished pieces is motivation for me.

Block Assembly

Two blocks for one quilt

The Garden Paths Quilt is designed around two block structures. You’ll make a different quantity depending on the size of the quilt. In this case, the baby quilt I made was relatively fast to assemble. This pattern comes with instructions for three sizes: Baby, Throw and Twin. I opted for a bleached white background, but now having seen other tester’s quilts, as well as the designer’s quilt in a dark background, all color combinations are stunning.

Long Arm Quilting

I had this quilt professional long-arm quilted by my friend, Deb, of Owl Quilt It. I’ve said it before, but choosing the motif or pantograph at the end of the piecing process, is often the hardest choice for me. This is a baby quilt, but the colors are not specifically “baby”. There are beautiful graphics in the fabrics and I wanted to highlight the theme and name of Garden Paths. When I saw this design, I knew it was right. Notice how the leaves and berries so closely mimic the florals of the Little Clementine fabric? No doubt this was what I was looking for in the quilting. 99% of the time, I opt for a white thread; I want it to blend into the quilt, and not be distracting. This one will get cozier with each wash & tumble dry!

I like dense quilting. Some quilts lend themselves to more open stitching, but I like it when my quilts have a little tighter sizing on the edge to edge quilting.

The Finish

Even my husband noted how much he likes this quilt. He’s my sidekick when it comes to photographing quilts, but also the one cheering me on along the way. He’s seen plenty of bright, bold, graphic prints and colors, so this one really got his attention. He said, “this isn’t usually what you choose, but I really like this one. I wouldn’t have thought I’d like it so much, but I really do.” Go figure….it’s OK to step outside our comfort zone of color!

Garden Paths Quilt featuring Art Gallery Fabrics

Quilt Backs

The Pieced Backing of my Garden Paths Quilt

If you follow me long enough, you’ll see a pattern of pieced quilt backs. I LOVE them. I do think there’s a beauty in a single fabric background, but I see the quilt back as one more chance to make something unique…it’s good “real estate”, if you will. You never know which side will be right side up when getting wrapped or cuddled with a quilt, so I want the back to be interesting too. It’s a good way to use any leftover bits and pieces that indicate what is found on the other side. You can see the Little Clementine fabric here, in all it’s glory. How sweet is that? It makes me smile. Oh, don’t forget to label your quilts! Artists sign their work; quilters should too.

All done…

The Details

This pattern is available beginning today, May 4, 2021 from http://www.whiteplainsquilts.com. All orders placed there today will be entered for a drawing to win $20.00 in shop credit. Patterns from this site will be discounted 20% until May 7, 2021. Brittany will also have limited quantities in quilt kits available, so shop early if you’re interested. This is not a sponsored post; I’m sharing these details so that you, too, can make this beautiful quilt pattern.

As I mentioned, I’ve used fabrics from Art Gallery Fabrics in prints and pure solids. This is also not sponsored by AGF (but I secretly, not so secretly, wish it were!). The feel of their fabric is delightful. The drape is something you just need to feel.

Thanks, Brittany, for including me once again in your team of pattern testers. I enjoyed it & I’m so happy with this fabric pull and finished quilt. I’m adding it to my collection of favorites!

All photos and content are property of Two Terriers Studio and not to be copied or distributed without written permission. This is not a sponsored post.

Scenic Road Quilt

When we think of Scenic Roads, it may bring memories of wide-open country spaces, city skyscrapers, or rocky cliffs with an ocean on the horizon. Each of us has a different place we consider scenic or that calls for us when we need space. When I think of scenic roads, the very first vision is that of a particular bridge that leads into one of my family’s long time summer get-away towns. Crossing that span, windows down, arms out of the car, inhaling the salty sea breeze equals summer and time together. It is a blessing.

I was asked by Amanda, of www.artbycritter.com, to test her Scenic Road Quilt pattern and when I learned the back story, I was all in. Her father created a real, wooden barn star, that now hangs on a barn at the corner of Scenic Road and Hubertus Road in Hubertus, Wisconsin. This quilt design was a tribute to his work and a collaboration for them in the form of this quilt. Having grown up in the midwest, and visiting farms of my own extended family, this concept and design rang true for me in many ways. I remember the drives down gravel roads, the barns, the barn stars. I also thought of how fortunate I’ve been to see so many places across the USA and how each is scenic in its own way. Family, special places and horizons meshed into a quilt? Yes, please!

Fabric Selection

For my version of this quilt, I opted for solid fabrics that remind me of the shore. The blues, greens, gray and a hint of pink are all reminiscent of sunsets across a sandy beach. I spent the first 18 years of my life, land-locked in the midwest, but the ocean is where I feel most at home. This quilt design and these colors seemed a perfect union of those two things. I also realized this would be my first-ever, all solid fabric quilt top. I tend to lean toward bright colors and graphic prints, so this was a new scheme. I selected fabric by Art Gallery Fabrics http://artgalleryfabrics.com from their pure elements collection. The drape of this fabric is perfect. So smooth and easy to sew. It makes for a dreamy finish.

Building Blocks

Even the “inside” of a quilt brings beauty. We so readily focus on the finish, but all great quilts start with a precise and solid foundation. I’m the first to admit, I like a quick to finish project. However, I’m slowly learning to enjoy not only the joy of that last stitch in a binding, but the measured and precise steps along the way. It all adds up, so I’m slowing down & enjoying the journey.

Beautiful solids by Art Gallery Fabric

A Completed Top at Hillstead

Once my quilt top was complete, I wanted to get it photographed. I was so happy with how it turned out and couldn’t wait to share. Finding a place in New England in the spring became a little challenging, because Mother Nature was delivering the wind. Lots of quilt-whipping wind! My husband helps me with every photo shoot and I was so thankful he had a good grasp on my work as we moved from place to place looking for stillness. This may have been day 2 or 3; the first day sent us home pretty wind-blown; toting a quilt that needed another pressing.

I love this shot taken at the Hillstead Museum. A beautiful home, now a museum, is the first architectural project of Theodate Pope Riddle, the fourth registered female architect in the USA. She is an early proponent of historical preservation and caretaker of the family art collection. I thought it a fitting scene for this project

Quilted

This is a large quilt, so I had it professionally long-arm quilted by my friend, Deb, of Owl Quilt It. I think she did a wonderful job and I really like the edge to edge design that swirls though the straight/geometric blocks. It reminds me of leaves, the wind and if I look just right, an “S”, which is the initial of my first name. I truly try to tie it all together with my projects, from the pattern to the final stitch.

The Finish

Ta-da! It’s all done. I’m thankful for the opportunity to have been included in this pattern tester group and I’m happy to add this to the collection of quilts that will stay with my family. The large blocks, simplicity and accuracy of instructions lead to a quick finish and a quilt I love.

Today, April 17, 2021, the pattern is available for purchase. Amanda has designed a limited edition art print and a sticker that are also available for purchase. Look at her Instagram account (@quiltsbycritter) for the link in her bio for these items. Proceeds from the limited edition print will be donated to @mentalhealthamerica.

I hope all roads lead you to places of joy, health & prosperity. Thanks for being here to see my version of the Scenic Road.

Enjoy & happy quilting!

All photos and content, property of Two Terriers Studio; not to be duplicated or shared without written consent. This is not a sponsored post. (I wish it were!)

Cozy Cabin Quilt

I’ve often admired quilt patterns by designer, Modernly Morgan, (www.modernlymorgan.com) so when she asked if I’d test this latest design, it was an easy “YES” from me. Morgan and I both have a love of scrappy quilts, so I was excited about the opportunity to work together. This pattern comes with instructions for three sizes – Baby, Throw and Bed. I made the 60″ square throw size.

Let’s just say, this pattern is a keeper.

The Making of a Quilt

Cozy Cabin is a modern twist on the traditional log cabin quilt block. The scrappy element is just a bonus, in my opinion. For my version of this quilt, I pulled a fat quarter bundle by Windham Fabrics www.windhamfabrics.com, designed by Amy Gibson, called Meriwether. The variety of florals, plaid, text, and blenders seemed the perfect foundation for this project. It’s bright and has a spring-like feel; just what I needed after a long winter.

I wouldn’t call a fat quarter bundle, “scrap”, in this case, it was “stash”. I purchased this collection a while back and saved it, knowing the right pattern would come along. Enter Cozy Cabin! When I first purchased this bundle, I didn’t have a pattern in mind, so I hadn’t accounted for the backing or binding. I consider myself very lucky that my local quilt shop had bolts of yardage, in stock, when it came time for me to finish the quilt. With the variety of colors and prints, I could have found a different fabric or collection to coordinate, but I’m thankful to have been able to keep the entire quilt in the Meriwether collection.

Half Square Triangles

Squaring up half-square triangles is an act of patience and accuracy. I actually prefer when a pattern has a little “wiggle room” in the measurements so that I can square-up to a perfect size, but I also like not having a lot of waste. This pattern calls for scant 1/4″ seams and as you can see, produces blocks with little waste.

Building the Blocks

Once the HSTs were made, I organized my remaining pieces into sets that would become one quadrant of each block. This step made it easy for me to pick up a set and sew as time permitted, even if I only had a few minutes between other obligations. The accuracy of the pattern made testing it a breeze. I was able to move through the sewing without issue.

This quilt came together so quickly. It’s a combination of the same block, repeated and rotated, throughout the layout. Once the pieces are cut and the HST trimmed, it was a lot of chain piecing for efficiency. I don’t tend to overthink blocks if I’m creating a scrappy look. Loving all the prints and knowing they work together certainly takes some of the worry out of the process for me. I had no doubt it would be cohesive.

I like the rotation of the blocks as it allowed me to think about the placement of pieces with text/font and how it would “read” once completely assembled. Additionally, if this were being made with a truly scrappy style, you could make each block independently with small pieces of fabric and make quite a dent in your scrap stash.

The top is pieced & swirled. This is the kind of cinnamon roll-like swirl that is calorie free! Look at all those delightful colors coming together.

The Finished Top/Front

There is always something fun for me in photographing a completed quilt top. My husband helps me every single time & thankfully, he’s tall and can keep them off the ground. To stand back, and see my effort and time spent creating a quilt, is gratifying. I think about the pattern, the designer, the fabric choice and how it tells a story. Seeing it from a distance also shows the secondary pattern; do you see it? Not just the stars, but the bands, joining the blocks. In our home, quilts are made to be used and loved. Seeing my favorite people enjoying something I’ve made makes it even more special.

Longarm Quilting and Binding

With this being a larger, 60″ square quilt, I opted to have it professionally quilted. When I make baby quilts, I feel more confident quilting them on my domestic machine, but I opt for straight lines and nothing too fancy. There are so many edge to edge designs available and I think this decision is one of the hardest for me to make in the entire process. Once it’s quilted, it is what it is and all the layers and seams are connected. It has to be right. I never want to get this close to the finish line and wing it. I used a 2.5″ straight cut binding and finished it by machine. Lately, I’ve been doing more binding by machine than by hand, because it takes practice and I’m comfortable practicing on quilts I know I intend to keep. Quilts I gift, those are mostly done with hand-stitched binding.

Here’s a closer look at the quilting pantograph. It’s an edge to edge design called Modern Twist.

Fabrics with text, fonts or inspirational messages are among my favorites. I wanted to include a large section of this yellow fabric in the quilt back, as well as using it for the binding. The evenly spaced rows of words almost give the binding a subtle stripe.

I enjoyed making this quilt & 100% plan to keep this one for myself! It’s a pattern I’d recommend and I think when you see the designer’s version and the other sizes and fabrics chosen by the team of testers, you’ll see that it works well in all colors and themes. Take a minute to visit Modernly Morgan on Instagram (@modernlymorgan) or her website, shown above, to purchase your own copy of this pattern. It is being released April 14, 2021.

Enjoy and happy quilting!

All photos and content property of Two Terriers Studio; not to be duplicated or shared without consent. This is not a sponsored post.

Spinning Top Quilt

Meet the Spinning Top Quilt, a pattern I tested in February 2021 for Monika Henry of Penny Spool Quilts (pennyspoolquilts.com). I’ve worked with Monika before this project & always find her patterns to be well-written, which also results in a lovely finish. This one is no different & I might add, I was able to finish piecing it in one, uninterrupted day. Yes, one day. The linear design & mirror image layout speeds up the process without sacrificing interesting design.

Art Gallery Fabrics

I used a couple of collections from Art Gallery Fabrics (artgalleryfabrics.com) for my baby sized version of this quilt. The florals are called Extempore Fancy and Extempore Celebration, designed by Sharon Holland (sharonhollanddesigns.com). I added pieces from both Art Gallery Fabrics “Fusion” Collections, Serenity & Ballerina, and a touch of Pure Solids. While I really like the softness of these colors together against the bleached white background, I think a bold or dark background fabric is equally pretty.

Binding strips ready to go, once the quilting is complete

Add-on pattern features

This pattern features cutting instructions for three sizes, pillow, baby & throw. As a consumer, I like having more than one size option for a specific design, but the add-on of the pillow size is really nice. While I could most likely adapt the pattern & calculate it to suit my needs, having the pillow dimensions already available is a nice touch.

For my pillow, I recreated the front of the quilt and kept the quilting simple with a few straight lines. The back of the pillow is a single panel and I opted to add my zipper to the bottom edge. I like this placement because when I sit it on a bed or chair, I orient the zipper to the bottom and it’s virtually invisible. It also keeps the back panel as one continuous piece.

Longarm Quilting

I sent this quilt to be professionally quilted on a long-arm machine. Some of my projects, I quilt myself, others, I leave to the pros! More specifically, if I have an intricate design in mind, or if the quilt is large, I send it out. This quilt is called Spinning Top. It’s a very linear design & initially I thought concentric circles would bring an illusion of “movement” but also break up the bands of horizontal color. When I shared my ideas with the pattern designer, she was already quilting her personal quilt with concentric circles! We laughed, realizing that we had the same idea. I then saw this edge to edge pattern and it immediately represented the mark a spinning top would leave, as it moved across the floor. Done. This is my choice. When I create, I’ve found the best results come when it all ties together for me into a story. The name, the fabrics, the feeling, the design. Granted, not all projects have that need or nuance, but when they do, I really like it and feel more connected to it from start to finish.

Spinning Top on a snowy day

I underestimated how tricky it might be to get good lighting and photos of a quilt with a white background on a snowy, February day. Luckily, my husband is more than willing to drive around with me until we find the right location! I could not do this without his help.

Spinning Top, a quilt in the wild…sewn by Two Terriers Studio

I had someone in mind as the recipient for this, but guess what? That someone is now “my collection”. Maybe there will be a duplicate in the future, but I’m not ready to let it go. Oh man, are we all singing that song, in our minds now?

Monika is offering 15% off the pattern price, in her shop, until February 21, 2021. No code will be needed at checkout, and the pattern will be available for purchase after that date as well.

Happy Quilting….

This post and project are not sponsored; all comments and photos property of Two Terriers Studio; not to be duplicated or shared without permission.